Stop WordPress Compressing Your Images at 82%
Raise the WordPress JPEG quality default of 82 with one filter, regenerate the thumbnails already stuck at 82, and know when PNG is the better fix.

TL;DR: WordPress re-encodes every JPEG derivative at quality 82. Raise it with the wp_editor_set_quality filter, then run wp media regenerate --yes — the filter alone does nothing to images already in wp-content/uploads. For screenshots and flat UI graphics specifically, raising the number only reduces the damage; switching the upload to PNG removes it, because PNG is lossless and the quality filter never touches it. See the JPEG quality tool to watch the artifacts appear on your own image, or the image sizes inspector to see which derivative your page is actually serving.
WordPress re-encodes every JPEG it generates at quality 82 on a 0–100 scale. That default lives in WP_Image_Editor::get_default_quality() and applies to every derivative WordPress cuts from your upload — thumbnail, medium, medium_large, large, and every extra size your theme registers. For photographs, 82 is a sane trade between file size and artifacts. For screenshots, UI captures, charts, logos, and anything with sharp text or flat color, 82 is visibly destructive: you get mosquito noise crawling around every letter and banding across smooth gradients.
To change it, add one filter and regenerate your thumbnails. To fix screenshots specifically, the better answer is usually to stop handing WordPress a JPEG in the first place. If the image looked soft rather than noisy straight out of upload, that is a different bug — see why WordPress images look blurry after upload, which is a resolution problem, not a compression one.
Where the number 82 actually comes from
WordPress dropped its JPEG default from 90 to 82 back in 4.5 (2016) as a page-weight optimization. The value is returned by get_default_quality() in wp-includes/class-wp-image-editor.php and is read whenever the active editor — WP_Image_Editor_Imagick if your host has Imagick, otherwise WP_Image_Editor_GD — writes a resized file.
The important detail: 82 is applied per derivative size, not once. Upload one image, and WordPress runs it through the encoder multiple times, re-quantizing at quality 82 each pass. The originally uploaded file itself is left untouched if it is under the big-image threshold (2560px on the long edge). If it exceeds that threshold, WordPress produces a re-encoded -scaled.jpg at quality 82 and serves that as the “full” size. So “my full-resolution image looks fine but the version on the page looks smeared” is almost always a srcset picking a quality-82 sub-size or the -scaled file.
How to change the quality
There is one filter to hook. wp_editor_set_quality is the modern, canonical one — it fires for JPEG and WebP and receives the MIME type so you can branch:
add_filter( 'wp_editor_set_quality', function ( $quality, $mime_type ) {
    if ( 'image/jpeg' === $mime_type ) {
        return 92; // up from 82
    }
    return $quality;
}, 10, 2 );
Put this in a small mu-plugin (wp-content/mu-plugins/) or a site-specific plugin. functions.php works too, but you lose the setting the moment you switch themes.
You will also see the older jpeg_quality filter recommended. It still fires (WordPress applies it right after wp_editor_set_quality, JPEG-only), but there is no reason to hook both — wp_editor_set_quality covers everything the old one did and more.
One thing everyone forgets: this filter only affects images encoded after it is active. Every thumbnail already sitting in wp-content/uploads was written at 82 and will stay at 82. Regenerate them:
wp media regenerate --yesIf you are not on WP-CLI, the Regenerate Thumbnails plugin does the same thing through the admin.
Raising the quality number also raises every derivative’s file size, which adds up across a large media library — if wp-content/uploads is already ballooning, read why the WordPress uploads folder gets too big before you regenerate everything at 92 or 100.
Before you commit to a number, it is worth seeing what a given quality actually does to your image rather than guessing. Our WordPress JPEG quality tool re-encodes a sample in the browser at every quality level so you can watch the artifacts appear — it makes the difference between 82, 90, and 100 obvious on a screenshot in a way that a number in a config file never will.
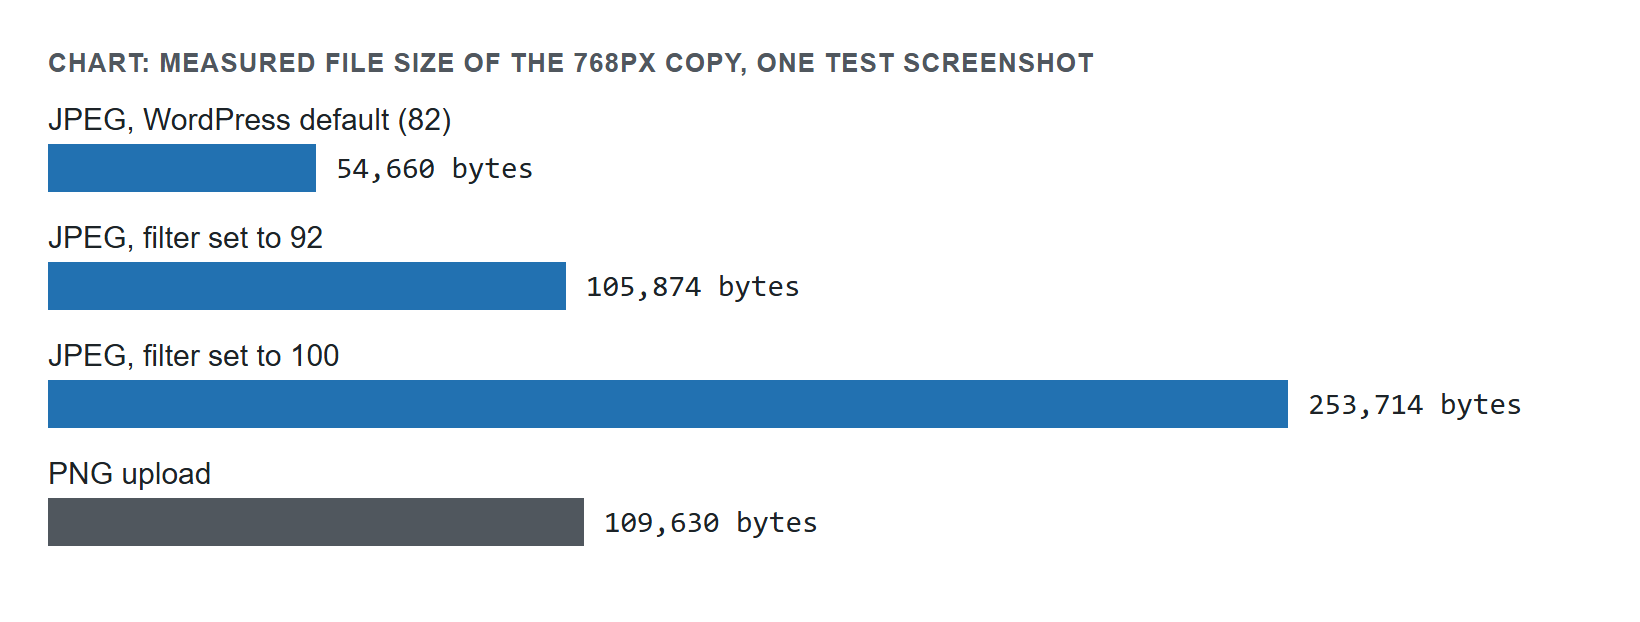
| Encoding | File size (bytes) |
|---|---|
| JPEG, default quality 82 | 54,660 |
| JPEG, quality 92 | 105,874 |
| JPEG, quality 100 | 253,714 |
| PNG | 109,630 |
That chart only measures file size, not how much of the image actually changed — so we ran a second, independent test to put a real number on the “visible artifacts” claim instead of just asserting it. Using the sharp/libvips JPEG encoder on a synthetic 640×360 image built to match a WordPress admin screen (a flat-color admin bar, hairline table borders, filename text, and two solid-color blocks — the exact hard-edge, flat-color mix a real screenshot has), we re-encoded it at the same quality levels and decoded each result back to raw pixels to measure the actual difference from the original, pixel by pixel:
| Encoding | Bytes | Mean pixel error (0–255 per channel) | Pixels visibly changed |
|---|---|---|---|
| PNG (lossless) | 15,151 | 0.000 | 0.00% |
| JPEG, quality 82 (default) | 17,459 | 0.863 | 4.09% |
| JPEG, quality 92 | 22,487 | 0.589 | 2.61% |
| JPEG, quality 100 | 32,859 | 0.412 | 2.31% |
On this test image, the lossless PNG was both smaller than default-quality JPEG and had zero pixel error, while every JPEG level — even 100 — still altered multiple percent of pixels, because JPEG quantizes even at its top setting. The full console output and method (synthetic image, libvips rather than WordPress’s own GD/Imagick encoder, and the caveats that come with both) are kept in this project’s internal test log for anyone on our team who wants to reproduce or extend it. The numbers will differ on your own screenshot and encoder, which is exactly why the JPEG quality tool lets you run the same comparison on your own file instead of trusting either table blindly.
The better fix for screenshots and flat graphics
Raising the JPEG number treats the symptom. The actual problem with screenshots is that JPEG is the wrong codec for them. JPEG’s DCT compression is tuned for photographic gradients; it falls apart on the hard black-on-white edges of text and UI chrome, which is exactly why quality 82 looks so much worse on a screenshot than on a photo of a beach.
Upload a PNG instead. WordPress keeps PNG sub-sizes as PNG, and PNG is lossless — the quality filter does not touch it, so there are no artifacts at any size, only clean resampling. For a screenshot, a well-optimized PNG is often smaller than a high-quality JPEG of the same image anyway, because flat color compresses well in PNG and terribly in JPEG.
If you want the smaller files of a lossy format without JPEG’s edge damage, WebP is the middle ground — but you still control its quality through the same wp_editor_set_quality filter shown above, branching on image/webp.
What not to do
Do not set quality to 100 globally. This is the top-voted answer on half the forum threads, and it is wrong. Quality 100 JPEG is not lossless — it still quantizes — but it inflates every photograph on your site by a large margin for no visible gain, dragging down LCP and Core Web Vitals. Raise the number for the format that needs it, or change format for graphics; don’t nuke compression sitewide.
Do not edit class-wp-image-editor.php. Changing the return value of get_default_quality() in core works until the next wp core update silently overwrites it. Use the filter.
Do not disable image sizes to “avoid the compression.” Turning off thumbnail generation doesn’t stop re-encoding — it breaks responsive srcset, so browsers download your full-size image on phones. Different problem, worse outcome.
Do not assume re-uploading fixes existing images. If you set the filter but skip the regenerate step, every old derivative is still quality 82. The filter is forward-looking only.
Do not blame the -scaled file if your images are under 2560px — that path never runs for them. If you are hitting it and want the untouched original served, that is a separate setting; see disabling scaled images or the full guide on why WordPress adds -scaled to images.
Still stuck?
If a specific size still looks wrong after regenerating, confirm which file the page is actually serving — open the image in a new tab and check whether the filename ends in a dimension suffix (-1024x768.jpg) or -scaled.jpg. The image sizes inspector shows every derivative WordPress generates from one upload, so you can see exactly which size your srcset is handing to the browser and stop debugging the wrong file.
Sources
- WordPress source code: class-wp-image-editor.php
- WordPress Developer Reference hooks: wp_editor_set_quality, jpeg_quality, big_image_size_threshold
- WP-CLI Handbook: wp media regenerate
William Lopez is the founder of Odie Themes. He builds the free WordPress tools and themes on this site and has been on WordPress.org since December 2019.
FAQ
Questions
Why do my WordPress images look worse after I upload them?
WordPress re-encodes every JPEG derivative it generates at quality 82 on a 0-100 scale, so the thumbnail, medium, medium_large and large versions all lose detail. That setting is a reasonable trade for photographs, but on screenshots, charts, logos and anything with sharp text it produces visible mosquito noise and banding.
How do I change the JPEG quality in WordPress?
Hook the wp_editor_set_quality filter and return a higher number, such as 92, when the MIME type is image/jpeg. Place it in a mu-plugin or a site-specific plugin rather than functions.php, since switching themes loses the setting. The older jpeg_quality filter still fires but adds nothing on top of it.
Does changing the quality filter fix images I already uploaded?
No. The filter only affects images encoded after it becomes active, so every derivative already sitting in wp-content/uploads stays at quality 82. Regenerate them with the WP-CLI command wp media regenerate --yes, or use the Regenerate Thumbnails plugin through the admin if you are not running WP-CLI.
Why does WordPress add -scaled to my image filename?
Because the upload exceeded the big-image threshold of 2560px on the long edge. When that happens WordPress writes a re-encoded -scaled.jpg at quality 82 and serves that as the full size. Images under 2560px never hit that path, so their original file is left untouched.
Should I set the WordPress JPEG quality to 100?
No. Quality 100 JPEG is not lossless, it still quantizes, and it inflates every photograph on the site for no visible gain, dragging down LCP and Core Web Vitals. Raise the number only for the format that needs it, or upload screenshots and flat graphics as lossless PNG instead.